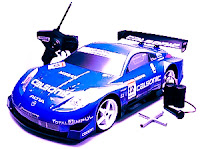
Playing cars that are controlled via radio signals is an interesting game. The much-loved toy cars children, plus a simple circuit will be the ideal toy car. This circuit families use traditional digital CMOS IC which requires very little electrical current, so it will not burden the original toy car performance.
In this system, radio signals are not transmitted continuously but only generated when the controller sends a command to the left / right or forward / backward, and even then only a radio-frequency discontinuous, so is sending pulses of radio wave frequency.
The number of pulses sent represent commands sent, GO command is represented with 8 pulses, is represented with 16 pulses LEFT, RIGHT DOWN 32 pulses and 64 pulses. Commands that can dikirimk is a combination of 2 orders once gus, which is a combination of command forward / backward and right / left, for example, could be sent forward orders and left once gus, in this case the number of pulses sent is 24, ie the sum of the forward command by 8 pulse and left the command of 16 pulses.
After a command is sent, the system stops sending commands in a certain time lag, the lag time it takes will be a series of recipients have sufficient time to fulfilling their orders well. Frequency pulses were visible on the right side of this.
 |
| Radio Control Transmitter Series |
How it works Transmitter
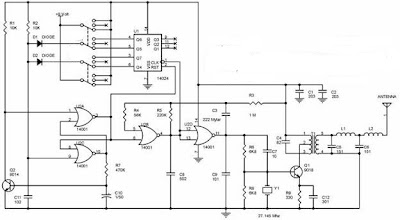
Radio signals generated by oscillator circuit formed by transistors Q1 9016, the working frequency of the oscillator is determined by the crystal Y1 is worth 27.145 MHz. A very critical part of this oscillator circuit is T1, L1 and L2, which specifically dealt with separately at the end of this article. Working from this oscillator is controlled by NOR gate U2D 14001, while the output gate (pin 3) is worth '1', the oscillator will work and transmit radio frequency 27.145 MHz, and at the output U2D value '0' the oscillator will stop working. U2D NOR gate receives the clock signal from NOR gate U2B. NOR Gate CMOS type with the aid of resistors R4 and R5 and capacitor C8 form a low frequency oscillator circuit for controlling the clock shaper of existing digital circuits. Work of this clock generator is controlled via the input leg 6, the circuit will generate the clock if this input berlevel '0 '.
NOR gate U2A and U2C form a series of Latch (RS Flip Flop), because of the influence of the resistor R2 and capacitor C11 is fed to pin 9 in U2C, when the circuit gets power supply output U2C must be '1 'and the output of U2A (leg number 3) becomes '0 '. This situation resulted Marja U2b clock generator works evoke reset the clock and remove the state of the enumerator 14 024 IC (U1), so that U1 started chopping and 27.145 MHz oscillator circuit sending pulses for generating a clock frequency of work.
At the start chopping, all the output of IC 14 024 enumerators in kedaan '0 ', after chopping 8 Q4 output pulse (pin 6) will be a '1', after counting 16 pulses output Q5 (pin 5) to '1 ', after chopping 32 Q6 output pulse (pin 4) to '1 ', after counting 64 pulses output Q7 (pin 3) to '1'.
Output over-output voltage used to control foot 9 U2C through diode D1 and D2, during one of the output is still worth '0 'then the clock generator U2B still working, this will continue until the cathode D1 D2 dankatode be '1' so that the foot 9 U2C be a '1 'as well. This situation will result in the output feet 3 U2A to '1 ', which stop the clock generator U2B and resets the enumerator 14 024 danberhenti already shipping 27 145 MHz pulse frequency.
To generate the lag time for receiver circuit has enough time carrying out orders, used a series of Q2 9014, resistor R7 and capacitor C10. The amount of delay time is determined by the value of R7 and C10. Switch to send command forward / backward and to send commands left / right are two separate switches. Each switch has 3 positions, the center position means that the scalar does not send commands.
Figure 2 is a picture that matched the car receiver circuit toy, serves to receive signals from the transmitter to control motor cars, so cars can move forward / backward and left / right. Transistor Q1 with the help of resistors, capacitors and T1 form as a series of radio signal receiver 27.145 MHz. T1 in this series exactly the same as T1 that is used in the transmitter circuit, means of manufacture are discussed below.
Transistor Q2 follows perlangkapannya forming circuit to convert the radio frequency pulses received from the transmitter into the box pulses that can be accepted as a digital signal by the CMOS IC. Digital signal will be received as the clock had to be chopped by chopper 14 024 IC (U2). Output 14 024 will be in accordance with the number of pulses sent by the transmitter, forward command and left (which is used as an example in the discussion of the transmitter) is the pulse number of 24, the results of counting these pulses cause the output to be 14 024 Q4 = '1 ', Q5 = '1', Q6 = '0 'and Q7 = '0'.
Digital signal received in addition be used as a clock IC 14 024 enumerators U2 discussed above, used also to drive the 3 pieces of the time delay circuit to generate pulses which controls the circuit work.
Toll regulator will first appear after delivery frequency pulse stopped because the lag time between sending the code, this pulse serves to record the count results to the U3 14 024 14 042 (D Flip Flop), making the final conditions of 14 024 will be retained to control the motor. After the results were recorded to 14 024 14 042, 14 042 enumerator is reset by the second pulse, after the lag time for 14,042 enumerators can count start from 0 again.
The circuit formed by transistors Q3, Q4, Q7, Q8, Q9 and Q10 named as H Bridge circuit, this circuit is very reliable to drive DC motors. With this series of DC motor can be rotated to the right-to-left or stop motion. The main requirement of the use of this circuit is the base voltage of Q7 and Q10 base voltage must be opposed, for example base Q7 = '1 'and the base of Q10 = '0' the motor rotates to the left, the base of Q7 = '0 'and the base of Q10 = '1' the motor will spin to the right, the base Q7 = '0 'and the base Q10 = '0' motor stop motion, but it should not happen, the base Q7 = '1 'and the base of Q10 = '1'.
Similarly, Q5, Q6, Q11, Q12, Q13 and Q14 form a H Bridge. H Bridge to the left in Figure 2 is used to control motors that adjust the cars moving left / right, while the H Bridge right part is used to control motors that regulate movement forward / backward cars. The relationship between outpur enumerator 14 042 and 14 024 Input D Flip Flop is structured so that the signal is fed to each H Bridge can not be all '1 'simultaneously.
Making transformer TX and RX
Transformer T1 in series transmitter and receiver, is the same stuff, and have created their own. Transformer was built using plastic transformer Koker (spare part radio) that have a step that looks 5 lanes that can be filled with rolls of wire, as shown in the photo. Using this Koker facilitate wire transformer winding. If you can not Koker similar to it, just use the usual. Koker feritnya transformer is small and is also small (3 mm) as the first is often used for assembly of 27 MHz CB radio.
Wire to the transformer can wear a wire in the unloading of these Koker, carefully open coil of wire that already exist within the Koker because the wire is smooth and quite easy to break.
Step 1: Roll away from the feet of wire fed into the number 5 ft 4 in the direction h (CW) as much as 3 rolls right in level 1 (point level above the lowest point)
Step 2: Wind the wire from leg 1 to leg 2 in a clockwise direction as much as 4 rolls right on level 2.
Step 3: Continue the roll (from step 2) clockwise a quarter roll to as much as 3 feet 3 at level three. (Can be determined exactly a quarter of the roll, because kokernya have a path cut into 4).
Making coil L1
Wind the copper wire diameter of 0.3 to 0.5 mm by 10 quarter rolls on Koker diameter about 4 mm (which will be released), also in a clockwise direction.
Making coil L2
Wind the copper wire diameter of 0.1 mm by 50 rolls of plastic Koker without ferrite diameter of about 3.5 - 4 mm (look for plastic materials from used goods) are also in a clockwise direction. The length of the section in liputi rolls along the 5 mm.


0 comments:
Post a Comment